
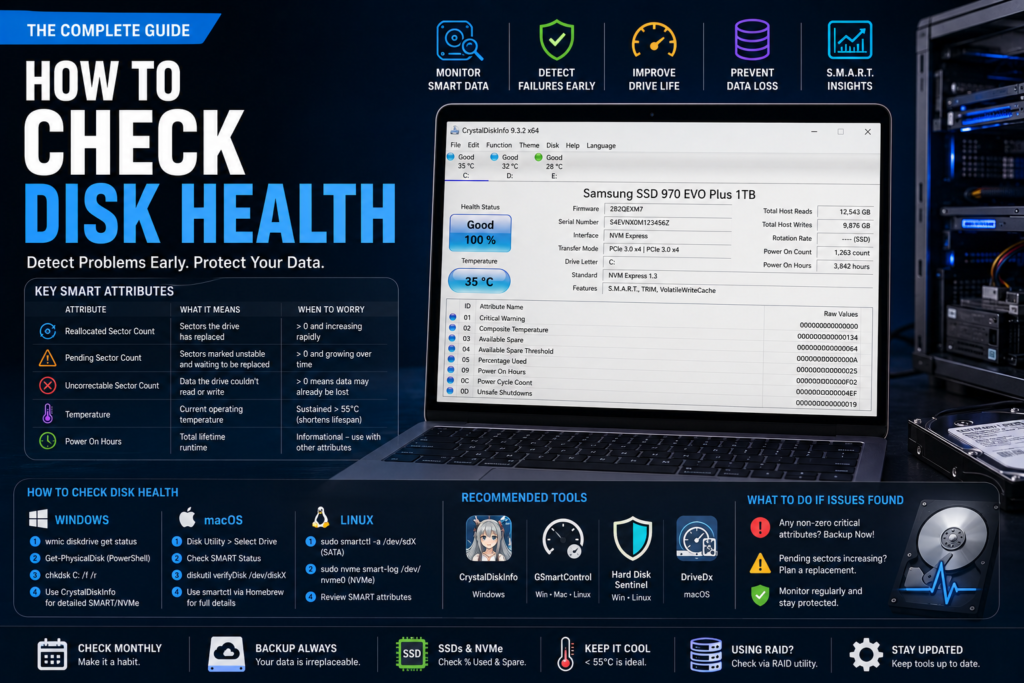
Running a command to check disk health is the easy part, most guides cover that in a few lines. The harder question, and the one almost nobody answers clearly, is what the numbers actually mean once you see them. A reallocated sector count of 5 might be nothing to worry about, or it might be the first sign of a drive you should back up tonight, and knowing the difference matters more than knowing which command to type. This guide walks through how to check disk health on Windows, Mac, and Linux, then goes further than most comparisons by actually explaining how to read the SMART data you get back, including why SSDs and NVMe drives need a different approach entirely. By the end, you will know not just how to run a check, but what to actually do with the result.
What SMART Data Actually Means
Most drives, whether a traditional hard disk or a solid state drive, include a built in feature called SMART, short for Self Monitoring, Analysis, and Reporting Technology. It constantly tracks a set of internal health indicators and stores them as raw attribute values you can pull up with a command or a free tool. The part almost every guide skips is telling you what those raw numbers actually mean once you see them.
| SMART Attribute | What a Rising Number Means | When to Actually Worry |
| Reallocated Sector Count | Sectors the drive has already retired and replaced | Any value above zero is worth watching, rapid increases mean back up now |
| Pending Sector Count | Sectors flagged as unstable but not yet reallocated | A nonzero value that keeps growing over a few weeks is a real warning sign |
| Uncorrectable Sector Count | Data the drive could not read or write even after retrying | Any nonzero value means data has likely already been lost or corrupted |
| Spin Up Time | How long the drive takes to reach full operating speed | A sudden large increase from your drive’s normal baseline is the signal, not the raw number alone |
| Temperature | Current operating temperature of the drive | Sustained readings above 55 degrees Celsius shorten lifespan meaningfully over time |
| Power On Hours | Total lifetime runtime of the drive | Informational on its own, useful mainly alongside the other attributes above |
The general rule worth remembering is that a few of these attributes matter far more than the rest. Reallocated sectors, pending sectors, and uncorrectable sectors are the three that most directly predict failure. A high power on hours count or a slightly elevated temperature reading on its own is rarely a reason to panic.
SSD and NVMe Health Works Differently Than a Traditional Hard Drive
This is where a lot of confusion starts, since a lot of check disk health advice was written with spinning hard drives in mind. Traditional SATA SSDs still report classic SMART attributes, but NVMe drives, the standard in most laptops and desktops sold in the last several years, report health through a genuinely different set of metrics.
- Percentage used, an estimate of how much of the drive’s total rated write endurance has been consumed
- Available spare, the percentage of backup storage cells still available to replace failing ones
- Media and data integrity errors, a count of actual read or write failures rather than sector level warnings
If you check an NVMe drive using a tool built around old style SMART attributes, you may not see the numbers that actually matter for that drive. Confirming your chosen tool explicitly supports NVMe health reporting is worth doing before trusting a clean looking result.
How to Check Disk Health, Step by Step on Windows
Windows includes several ways to check disk health without installing anything, though each gives you a different level of detail.
- Open Command Prompt as administrator and run wmic diskdrive get status. A result of OK means Windows sees no reported problems, though this check is fairly shallow
- For a more detailed SMART reading, open PowerShell as administrator and run Get-PhysicalDisk followed by Select-Object FriendlyName, HealthStatus, OperationalStatus
- Run chkdsk C: /f /r from an administrator Command Prompt to scan for file system errors and bad sectors specifically, separate from SMART monitoring, since chkdsk checks logical file structure rather than physical drive health
- For NVMe specific detail, a third party tool like CrystalDiskInfo translates raw SMART and NVMe attributes into a readable status rather than leaving you to interpret hex values yourself
It is worth understanding that chkdsk and SMART checks answer different questions. Chkdsk looks at whether your file system is internally consistent. SMART looks at whether the physical drive itself is degrading. A clean chkdsk result does not mean the drive is physically healthy, and a clean SMART result does not mean your files are free of corruption.
Third Party Tools Worth Installing
Built in commands cover the basics, but a dedicated free tool makes the data far easier to actually read and interpret.
CrystalDiskInfo, Windows. Translates raw SMART and NVMe attributes into a plain colored health status, genuinely the easiest starting point for most people.
GSmartControl, Windows, Mac, and Linux. A graphical front end for smartmontools, useful if you want the full attribute list without typing terminal commands directly.
Hard Disk Sentinel, Windows and Linux. Adds ongoing background monitoring and alerts, useful if you want to be notified automatically rather than checking manually.
DriveDx, Mac. Purpose built for Mac users who want deeper SMART and NVMe reporting than Disk Utility’s simple Verified or Failing status.
Installing one of these and letting it run quietly in the background is a reasonable next step once you have confirmed the manual check works on your system.
Checking Disk Health on Mac and Linux
Mac users can open Disk Utility, select a drive, and check the SMART Status line at the bottom of the window, which reads Verified on a healthy drive. For more detail, Terminal supports diskutil verifyDisk for a logical check, and smartctl, installable through Homebrew, for full SMART and NVMe attribute reporting.
Linux users generally get the most direct access to this data. Installing smartmontools and running sudo smartctl -a /dev/sdX, replacing sdX with your actual drive identifier, returns a full attribute breakdown for SATA drives, while sudo nvme smart-log /dev/nvme0 covers NVMe specific metrics properly rather than forcing NVMe data into an old SATA style report.
External and USB Connected Drives Need a Different Approach
This is a real practical gotcha that most guides skip entirely. SMART data has to pass through a USB bridge chip to reach your computer, and a lot of external enclosures either block this data entirely or report it incorrectly. A drive that looks perfectly healthy when checked externally may actually be reporting nothing at all, rather than genuinely reporting good health.
If you need an accurate health check on an external drive, removing it from its enclosure and connecting it directly via SATA or NVMe, where practical, gives a far more reliable result than trusting a SMART reading pulled through USB.
How Often You Should Actually Check
A monthly check is a reasonable default for a drive holding anything you care about, since SMART attributes tend to change gradually rather than overnight, giving you a real window to react. If you already own a drive with a known weak reliability history, or one that has thrown even a single reallocated sector, checking weekly until you have replaced it is a more sensible cadence than waiting for the next scheduled check.
What to Actually Do Once You See a Warning
- Any nonzero reallocated or uncorrectable sector count: back up your data today, not this weekend
- A predictive failure flag from SMART showing true: treat this as a countdown, not a suggestion, and move critical files off immediately
- A pending sector count that is growing week over week: plan a replacement now, even if the drive still boots and runs normally
- An isolated, non repeating SMART attribute change with no other warning signs: keep monitoring monthly rather than assuming disaster
Checking your drive manufacturer’s own diagnostic tool alongside a general SMART reader is worth doing once you see any warning, since some manufacturers run a deeper extended test that a generic tool cannot perform.
A Note on RAID Arrays
If your drives are part of a RAID array, checking disk health gets more complicated, since the RAID controller often sits between your operating system and the physical drives, blocking direct SMART access the same way a USB enclosure can. Most RAID controllers include their own monitoring utility specifically for this reason, and it is worth using that dedicated tool rather than assuming a generic SMART reader can see through the array correctly.
Learning how to check disk health is only half the job, understanding what the result actually means is what protects your data. Start with SMART for an early warning, confirm whether your tool actually supports NVMe metrics if that is what you are running, and treat any nonzero reallocated or uncorrectable sector count as a genuine reason to back up immediately rather than wait. Combine that with chkdsk or fsck to catch file system level problems SMART cannot see, and a monthly habit of checking disk health will catch most drive failures with enough warning to act.